Posts

Irish Moss Stitch Faux Cardigan

Image
This pattern is provided in written and video format (coming soon), so hopefully it will make sense to everyone.  The pattern has not been tested for different sizes so is provided for free. I have tried to write the pattern so it is adjustable for different body types/sizes. The Irish Moss Stitch Combo measures about 7cm so add length to the body and sleeves by repeating the combo as many times as required. Schematic and Measurements I made the sweater with approx. 3cm of negative ease in the bust so it will be form fitting up top but looser on the waist and hips. If you have different proportions to me the sweater may fit you a little differently. Centimetres A: 36, B: 56 , C: 60 (front) ,  D: 55 (back) , E: 32, F: 37 ,  G: 22, H: 20 , I: 12, J: 14 Inches   A: 14, B:22, C:23.5 (front), D:21.5 (back), E:12.5, F:14.5, G:8.5, H:8, I:4.75, J:5.5 Stitch Terminology Cast on: Standard cast on using in front and behind method Irish Moss Stitch Combo: 12 rows normal knitting, MSO, 2

Witchful Thinking Wrist Warmers

Image
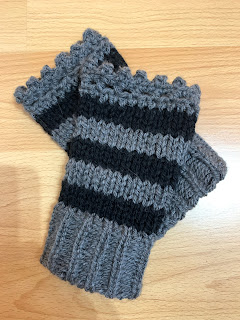
Finished Measurements: Circumference: 19-24 cm Length: 20cm You will need: • 36g main colour (grey) • 10g contrast colour (black) • Circular knitting machine • Loom Pick • Crochet hook (5mm) Abbreviations: CO: Cast on MC: Main Colour CC: Contrast Colour K: Knit SC: Single Crochet SLST: Slip Stitch Ch: Chain HDC: Half Double Crochet FLSC: Front loop single crochet P (picot): Pick up front loop and side loop, yarn over, pull through all loops Part 1: Wrist Warmer Part 1 is constructed using a Circular Knitting Machine but can be constructed by hand if preferred. CO 25 Row 1-29 (MC): Knit 25 Row 30 (MC): K2, (Drop 1 column and purl with crochet hook, K1) repeat until needle 24, K2 Row 31 (CC): K1, attached cast on row to each needle, K1 Row 32-34 (CC): Knit 25, twist colours to travel the yarn up the side. Row 35-38 (MC): Swap Colours, Knit 25, twist colours to travel the yarn up the side. Row 39-42 (CC): Swap Colours, Knit 25, twist colours to travel the yarn up the side. Row 43-46 (MC):

Knit a Raglan Sweater without a patterns

Image
This method of construction will enable you to create a custom sweater for yourself or someone else without using a pattern.  So if you struggle to read patterns, or like me you just don't have the attention span to follow one or perhaps you live in a household where there are constant interruptions then this is hopefully a solution for you. As there is no pattern so there are no gauges to worry about so you can just get started right away and use whatever size hook or needle you like to work with. Step 1: Casting on So like all projects we will start by casting on, there are no numbers with this technique, all I want you to do is cast on enough stitches so you can create a circle that fits over your head. I find from crown to chin is usually a good length.  When you have a chain long enough, slip stitch to make a circle and add our first marker.  This marker will mark the start of each round, we wont be counting rounds but its good to know where to stop when we get to that point.

Cable Beanie

Image
 Cabled Beanie on a Circular Knitting Machine Pattern Strips - Make 2 Cast on 7 stitches Knit 100 rows Cast off Add markers to each side every 14 rows Brim Cast on 28 stitches Knit one row Attach strip 1 at needles 3 and 7 Attach strip 2 at needles 8 and 12 Finish knitting the row Knit normally until row 14 Row 14: Cross the strips and using the markers, attach to needles 3 and 7, then 8 and 12 Repeat steps 6 and 7 for rows 28, 42, 56, 70, 84 and 98 Knit 2 more rows, so you have 100 rows Join the brim into a tube using kitchener stitch The hat Attach the brim to the machine Add your working yarn and knit 30 rows Cast off using your working yarn Pull tight, add a few stitches to hold the hole closed Bury the yarn inside the hat and tie it off

Knit a lace sweater with Sentro circular knitting machine

Image
  I will eventually be writing a full pattern for this sweater but for now here is the pattern for the lace details and a full video tutorial for the lace front and the entire sweater: Lace Pattern Tables For every row in the table you will move a stitch from the numbered needle to the following needle.  This pattern is a 12 row repeat and you will repeat it fully 5 times.  I have added stars to the table to remind you to shape the arms and neckline. You can print off the tables and tick each row as you go. How to read the table The table is meant as a check list rather than a grid pattern.  The numbers along the top of the table represent the row numbers and the numbers in the first column are the stitches you need to move. We will work from top to bottom, left to right. So start at row 4 of your project and move stitches 7, 16, 26 and 35. Knit row 5 as normal. Place a tick in the first empty box in the table. Then we move down to the next row on the table, row 6 of your knitting,